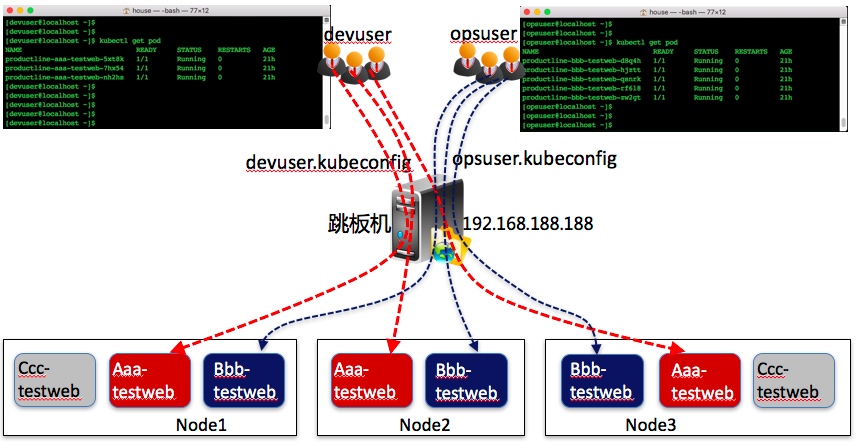
设置RBAC规则来实现多用户权限隔离访问
1 AAA和BBB产品线容器的环境准备
1.1 两个产品线的权限隔离说明
假如我们公司有productline-aaa和productline-bbb两个产品线,每个产品线都有各自相应的负责人。要求每个产品线的负责人只能管理自己产品线的容器,实现效果如下:
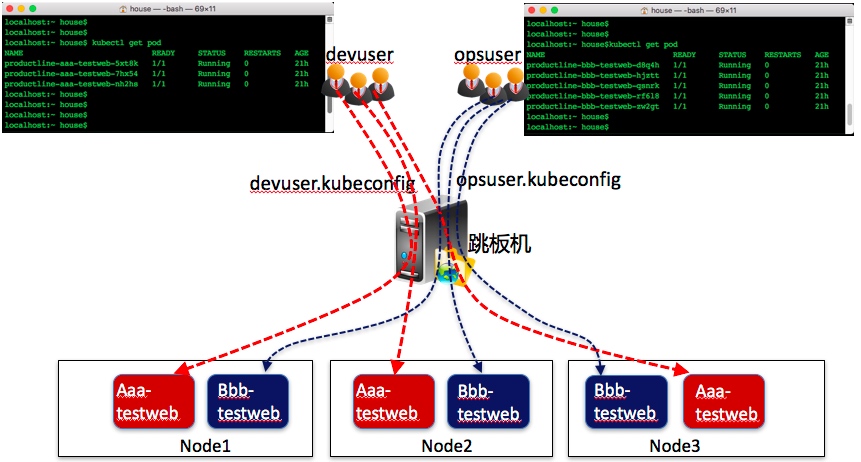
为了方便演示,我这里建productline-aaa和productline-bbb两个不同的命名空间,并分别在每个命名空间中创建几个容器和service。
1.2 创建两个产品线的容器环境
创建productline-aaa命名空间,并在productline-aaa命名空间中创建2个productline-aaa-testweb容器和productline-aaa-testweb服务,productline-aaa同理。
编写yaml代码 aaa产线
apiVersion: v1
kind: Namespace
metadata:
  name: productline-aaa
---
apiVersion: v1
kind: ReplicationController
metadata:
  name: productline-aaa-testweb
  namespace: productline-aaa
  labels:
    name: productline-aaa-testweb
spec:
  replicas: 2
  selector:
    name: productline-aaa-testweb
  template:
    metadata:
      labels:
        name: productline-aaa-testweb
    spec:
      containers:
      - name: productline-aaa-testweb
        image: 10.57.26.15:4000/guestbook-php-frontend
        env:
        - name: GET_HOSTS_FROM
          value: env
        ports:
        - containerPort: 80
---
apiVersion: v1
kind: Service
metadata:
  name: productline-aaa-testweb
  namespace: productline-aaa
  labels:
    name: productline-aaa-testweb
spec:
  ports:
  - port: 80
  selector:
    name: productline-aaa-testweb
bbb产线
apiVersion: v1
kind: Namespace
metadata:
  name: productline-bbb
---
apiVersion: v1
kind: ReplicationController
metadata:
  name: productline-bbb-testweb
  namespace: productline-bbb
  labels:
    name: productline-bbb-testweb
spec:
  replicas: 2
  selector:
    name: productline-bbb-testweb
  template:
    metadata:
      labels:
        name: productline-bbb-testweb
    spec:
      containers:
      - name: productline-bbb-testweb
        image: 10.57.26.15:4000/guestbook-php-frontend
        env:
        - name: GET_HOSTS_FROM
          value: env
        ports:
        - containerPort: 80
---
apiVersion: v1
kind: Service
metadata:
  name: productline-bbb-testweb
  namespace: productline-bbb
  labels:
    name: productline-bbb-testweb
spec:
  ports:
  - port: 80
  selector:
    name: productline-bbb-testweb
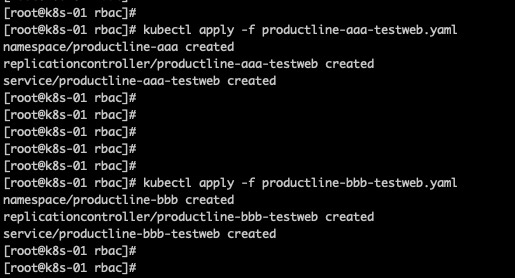
使用kubectl apply -f productline-aaa-testweb.yaml 和 kubectl apply -f productline-bbb-testweb.yaml 创建ns,rc和service
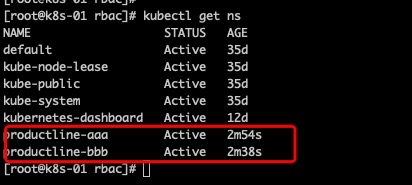
使用kubectl get ns查看刚创建的ns
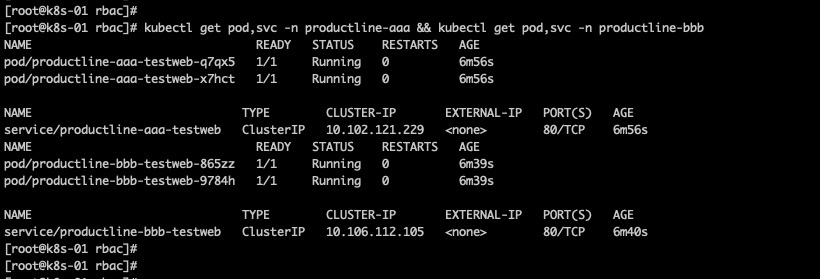
输入kubectl get pod,svc -n productline-aaa && kubectl get pod,svc -n productline-bbb查看两个ns(部门)对应的pods和service,如下图所示:
tips:在测试的时候副本数不能大于node数,若大于多出来的pod将创建失败,通过更改yaml配置文件的副本数,然后再执行kubectl apply -f <yaml>即可更新状态,kubectl edit rc productline-aaa-testweb -nproductline-aaa 类似这样修改rc也可以达到一样的效果。
2 准备环境
2.1 下载cfssl工具
wget https://pkg.cfssl.org/R1.2/cfssl_linux-amd64
chmod +x cfssl_linux-amd64
mv cfssl_linux-amd64 /usr/local/bin/cfssl

wget https://pkg.cfssl.org/R1.2/cfssljson_linux-amd64
chmod +x cfssljson_linux-amd64
mv cfssljson_linux-amd64 /usr/local/bin/cfssljson

wget https://pkg.cfssl.org/R1.2/cfssl-certinfo_linux-amd64
chmod +x cfssl-certinfo_linux-amd64
mv cfssl-certinfo_linux-amd64 /usr/local/bin/cfssl-certinfo
2.2 生成默认的配置文件和证书签名请求文件
生成配置文件后可以基于这些配置文件进行修改
cfssl print-defaults config > ca-config.json
cfssl print-defaults csr > ca-csr.json
3 创建devuser用户访问productline-aaa产品线
3.1 创建用于kubectl使用的devuser
3.1.1 cfssl下载
3.1.2 生成证书
cfssl gencert --ca /etc/kubernetes/pki/ca.crt --ca-key /etc/kubernetes/pki/ca.key --config k8s-gencert.json --profile kubernetes devuser-csr.json | cfssljson -bare devuser

就会生成下面的文件:

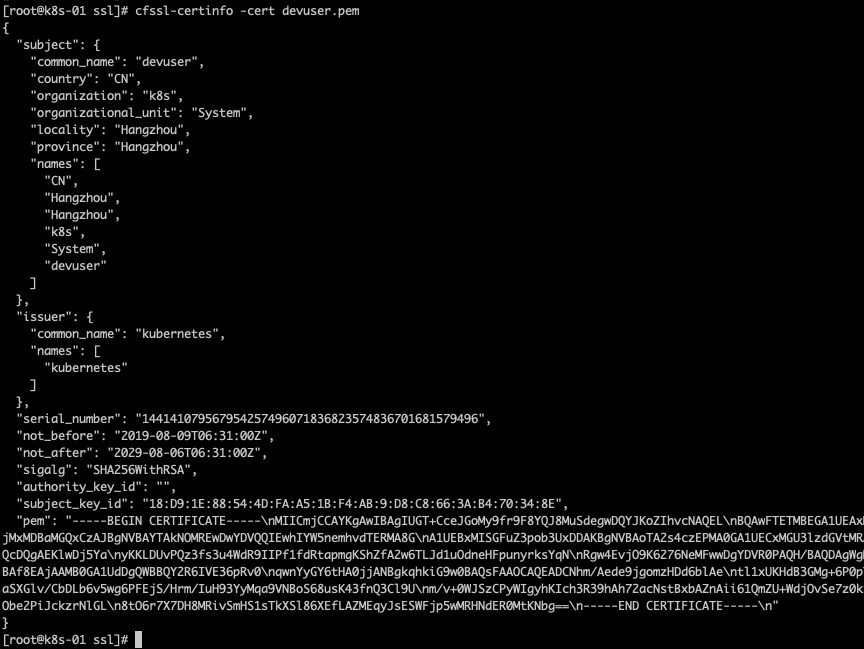
3.1.3 校验证书
cfssl-certinfo -cert devuser.pem
3.1.4 生成config文件
在部署k8s平台的时候已经生成了kubeconfig,我们可以直接利用这个文件,省的自己再去配置集群参数
cp /etc/kubernetes/admin.conf devuser.kubeconfig
3.1.5 设置客户端认证参数
kubectl config set-credentials devuser \
--client-certificate=devuser.pem \
--client-key=devuser-key.pem \
--embed-certs=true \
--kubeconfig=devuser.kubeconfig

3.1.6 设置上下文参数:
kubectl config set-context kubernetes \
--cluster=kubernetes \
--user=devuser \
--namespace=productline-aaa \
--kubeconfig=devuser.kubeconfig

3.1.7 设置默认上下文:
kubectl config use-context kubernetes --kubeconfig=devuser.kubeconfig

以上执行一个步骤就可以看一下 devuser.kubeconfig的变化。里面最主要的三个东西
cluster: 集群信息,包含集群地址与公钥 user: 用户信息,客户端证书与私钥,真正的信息是从证书里读取出来的,人能看到的只是给人看的。 context: 维护一个三元组,namespace cluster 与 user
3.2 创建AAA产品线管理员角色
创建一个叫pod-reader的角色 输入以下yaml,并保存为productline-aaa-pod-reader.yaml
kind: Role
apiVersion: rbac.authorization.k8s.io/v1
metadata:
  namespace: productline-aaa
  name: aaa-pod-admin
rules:
- apiGroups: ["*"]
  resources: ["*"]
  verbs: ["*"]
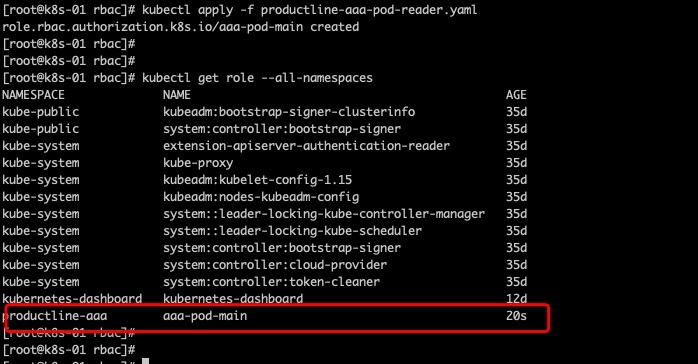
输入kubectl apply -f productline-aaa-pod-reader.yaml创建role。
通过输入kubectl get role --all-namespaces查看创建的role
3.3、将devuser绑定到AAA产品线管理员角色
创建一个角色绑定,把pod-reader角色绑定到 devuser上
输入以下yaml,并保存为productline-aaa-devuser-role-bind.yaml
kind: RoleBinding
apiVersion: rbac.authorization.k8s.io/v1
metadata:
  name: admin-aaa
  namespace: productline-aaa
subjects:
- kind: User
  name: devuser
  apiGroup: rbac.authorization.k8s.io
roleRef:
  kind: Role
  name: aaa-pod-admin
  apiGroup: rbac.authorization.k8s.io
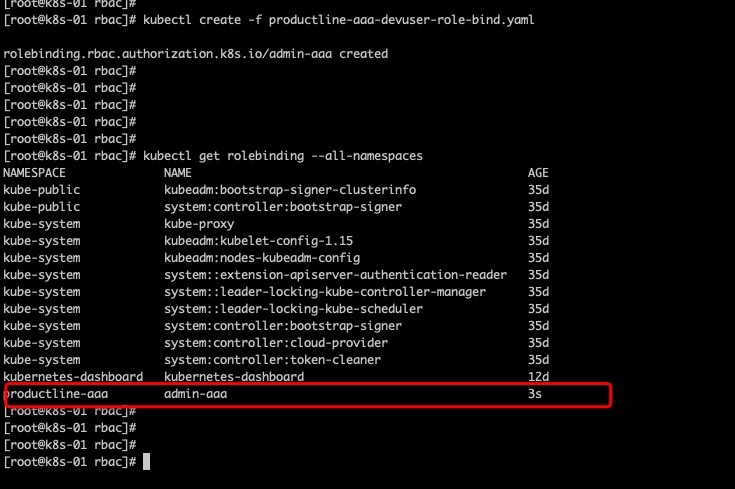
输入kubectl apply -f productline-aaa-devuser-role-bind.yaml创建role-binding。
通过输入kubectl get role --all-namespaces查看创建的rolebinding
3.4、测试devuser.kubeconfig的访问效果
使用新的config文件替换原有的config来访问试试:
先将原有的kubeconfig备份一下。

我们用kubectl get pod查看到的只是productline-aaa产品线下的所有容器:

来登录productline-aaa产品线下的其中一个容器试试:
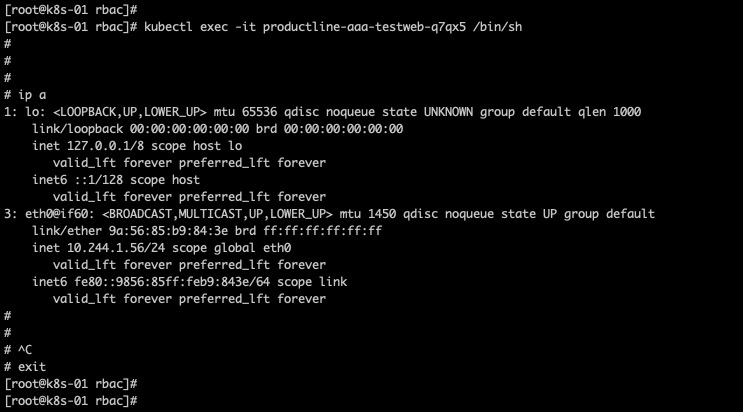
使用kubectl get pod -n default等各种命令试图进入其他命名空间,显然失效。因为devuser没有别的namespace的权限了。

4 创建opsuser用户访问productline-bbb产品线
4.1 创建用于kubectl使用的opsuser
流程和第二步一致,提供一个脚本简化执行
证书和上下文相关
# 生成证书请求文件
cat > opsuser-csr.json << EOF
{
    "CN": "opsuser",
    "hosts": [],
    "key": {
        "algo": "ecdsa",
        "size": 256
    },
    "names": [
        {
            "C": "CN",
            "L": "Hangzhou",
            "ST": "Hangzhou",
            "O": "k8s",
            "OU": "System"
        }
    ]
}
EOF

# 生成证书
cfssl gencert --ca /etc/kubernetes/pki/ca.crt --ca-key /etc/kubernetes/pki/ca.key --config k8s-gencert.json --profile kubernetes opsuser-csr.json | cfssljson -bare opsuser

# 生成config文件
cp /etc/kubernetes/admin.conf opsuser.kubeconfig

# 客户端认证参数
kubectl config set-credentials opsuser \
--client-certificate=opsuser.pem \
--client-key=opsuser-key.pem \
--embed-certs=true \
--kubeconfig=opsuser.kubeconfig

# 上下文参数
kubectl config set-context kubernetes \
--cluster=kubernetes \
--user=opsuser \
--namespace=productline-bbb \
--kubeconfig=opsuser.kubeconfig

# 设置默认上下文
kubectl config use-context kubernetes --kubeconfig=opsuser.kubeconfig
4.2 创建BBB产品线管理员角色
cat > productline-bbb-pod-reader.yaml<<EOF
kind: Role
apiVersion: rbac.authorization.k8s.io/v1
metadata:
  namespace: productline-bbb
  name: bbb-pod-admin
rules:
- apiGroups: ["*"]
  resources: ["*"]
  verbs: ["*"]
EOF

kubectl create -f productline-bbb-pod-reader.yaml

cat>productline-bbb-devuser-role-bind.yaml<<EOF
kind: RoleBinding
apiVersion: rbac.authorization.k8s.io/v1
metadata:
  name: admin-bbb
  namespace: productline-bbb
subjects:
- kind: User
  name: opsuser
  apiGroup: rbac.authorization.k8s.io
roleRef:
  kind: Role
  name: bbb-pod-admin
  apiGroup: rbac.authorization.k8s.io
EOF

kubectl create -f productline-bbb-devuser-role-bind.yaml
4.3 测试opsuser.kubeconfig的访问效果

5 配置跳板机实现多用户隔离远程访问
对于跳板机的要求其实很简单,只要一个普通的Linux服务器就行了。
5.1 给跳板机安装kubectl工具
翻墙下载相关软件包
wget https://dl.k8s.io/v1.8.5/kubernetes-node-linux-amd64.tar.gz
解压后将kubectl复制到/usr/bin目录并附权
cp kubernetes/node/bin/kubectl /usr/bin/
chmod 755 /usr/bin/kubectl

5.2 给跳板机创建devuser和opsuser
给跳板机分别创建devuser和opsuser,分别给productline-aaa和productline-bbb两个产品线的负责人。
useradd devuser
useradd opsuser
ls /home

切换到devuser和opsuser下面,分别创建“.kube”目录,并验证
mkdir -p /home/devuser/.kube
mkdir -p /home/opsuser/.kube
ls -a /home/devuser/
ls -a /home/opsuser/
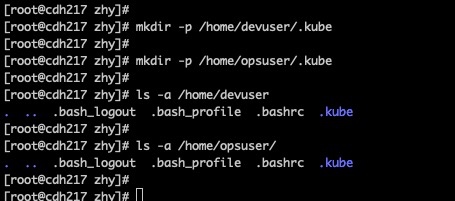
5.3 分发config到跳板机
把我们在第三章和第四章生成好的devuser.kubeconfig和opsuser.kubeconfig文件分别对应分发到跳板机的/home/devuser/.kube目录和/home/opsuser/.kube目录
scp devuser.kubeconfig opsuser.kubeconfig admin@10.57.30.217:/tmp

然后在跳板机上分别拷贝
mv /tmp/devuser.kubeconfig /home/devuser/.kube/config
mv /tmp/opsuser.kubeconfig /home/opsuser/.kube/config
并把config的own赋给相对应的用户
chown -R devuser:devuser /home/devuser/.kube/config
chown -R opsuser:opsuser /home/opsuser/.kube/config
ls -l /home/devuser/.kube/config
ls -l /home/opsuser/.kube/config
5.4 使用不同用户登录访问各自产品线的容器
测试两个不同用户访问的pod
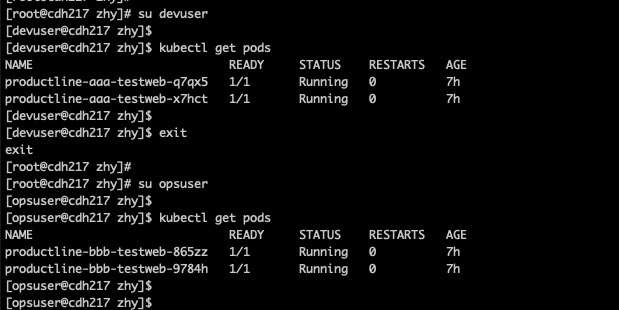
测试两个不同用户跨namespace访问
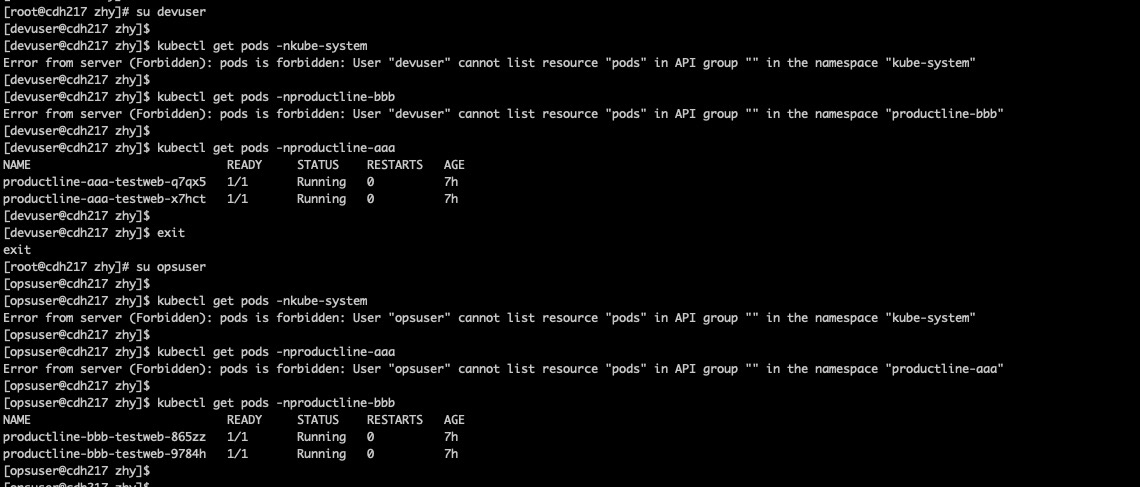
测试两个不同用户进入pod
可以看到如下图所示,不能进入其他namespace的pod。


最后达到了如下图所示的效果
